Before you start
A working ReShade installation, a preset INI and every shader or texture that the preset requires.
Downloads for this guide
Choose the files your setup needs. Paid packages require access through their author.
DigitalDreams presets, Adaptive Vision and shader packages
Use the package for your game and its included README. A preset, shader and add-on can require different installation steps.
ReShade shader collection
Open Code → Download ZIP, or install the package through ReShade setup.
qUINT shader collection
The author’s repository. Use Code → Download ZIP; qUINT is also listed in the ReShade installer.
Marty’s Mods / Pascal Gilcher shaders
For author packages such as RTGI when your preset specifically requires them. Access depends on the author’s membership.
ReShade installer
Install ReShade first, then return here to add your files.
Read the preset’s requirements
A preset stores settings; it does not contain all of its effects. Download the required shader packages from their authors. Get DigitalDreams packages through our Patreon and read the included instructions.
Write down the required preset INI, shader names, textures and any add-ons. Adaptive Vision and path-tracing packages can have their own requirements. Use the author’s specified versions rather than assuming every preset includes the effects it references.
Extract the downloaded archives
For a GitHub shader repository, use Code → Download ZIP and extract the archive. For Patreon or an author download, extract the supplied files directly. The links above distinguish optional packages from the DigitalDreams download.
Open the extracted archive until you see the Shaders folder and any Textures folder. GitHub ZIP files often contain an extra outer folder named after the repository. Copying only that outer folder can put the effect files outside the configured search paths.
Place shaders and textures
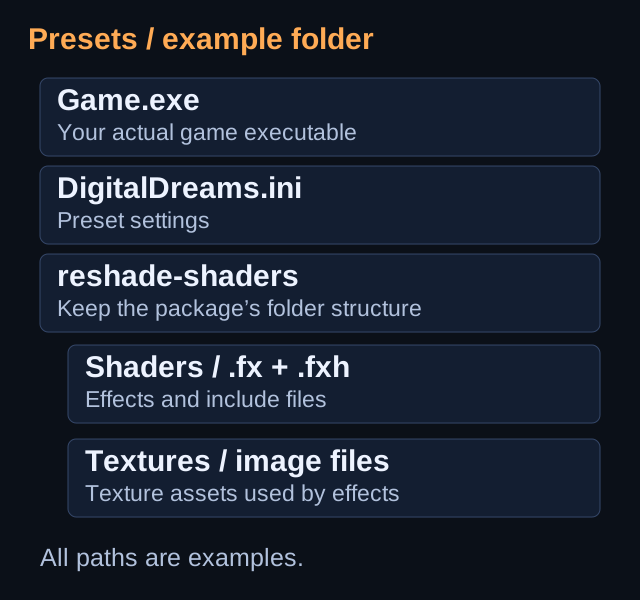
Extract the package. Merge its reshade-shaders folder into the game folder if instructed. Shader files (.fx, .fxh) belong in Shaders; texture assets belong in Textures. Preserve nested folders and avoid overwriting newer files blindly.
For example, an effect can end up at C:\Games\MyGame\reshade-shaders\Shaders\MyEffect.fx. Avoid accidentally nesting reshade-shaders\reshade-shaders\Shaders. Back up existing versions before replacing shared shader files.
Check ReShade’s search paths
Open the overlay with Home. In Settings, check that Effect search paths and Texture search paths point to the folders you installed: .\reshade-shaders\Shaders\** and .\reshade-shaders\Textures\**. Use the package’s specified paths if its layout differs.
The recursive ** includes subfolders. Return to Home and click Reload after correcting a path. If an effect still fails, check its error in Log before changing other settings. Relative paths start from the game EXE’s directory.
Select the preset
Place the preset .ini in the game folder, or another folder you can browse to. On ReShade’s Home tab, select it using the preset selection bar. Click Reload after adding effects.
Select the preset file itself, not ReShade.ini, which holds ReShade application settings. Wait for compilation. If a named effect is absent from the list, install its shader dependency rather than renaming the preset.
Check depth for lighting and focus effects
Ambient occlusion, depth of field and many lighting effects need the game’s depth buffer. Use the package’s game-specific instructions first, then the depth-buffer guide to inspect Generic Depth and DisplayDepth.
The depth image should follow the scene instead of showing a flat screen or an incorrect orientation. Copy-depth and preprocessor values vary by game; another game’s values are not a reliable template.
Check the result in-game
Confirm the expected effects are enabled. Compare the same scene with effects on and off. Save any changes you want to keep. For depth-based effects such as ambient occlusion, check the shader author’s depth-buffer guide.
Check a moving scene, dark areas and menus as well as a screenshot. Keep the author’s effect order unless instructed otherwise. If performance drops, test costly effects individually and review their quality settings. Home’s Performance Mode can help after editing, but verify it works with your effects.
Keep the original and save your own copy
Save personal changes to a separate preset, for example DigitalDreams-MyTweaks.ini. Keep the downloaded original so you can compare or start over. Relaunch the game and confirm your selected preset loads.
Before updating, check new shader dependencies and instructions. Store older versions outside the active shader search folders so two versions of the same effect do not compile together.
Troubleshooting
The preset loads but looks unchanged.
Check the enabled effects on Home. An INI alone cannot supply missing shaders. Review the preset’s dependencies and your search paths.
Effects show compile errors.
Read the error in the overlay Log. Check missing includes, textures and required shader versions; reinstall the matching package, then Reload.
How do I remove ReShade?
Run the official setup tool again for the same executable and API, then choose its uninstall option. Keep a copy of your preset if you want to reuse it.
GO TO THE SOURCE
Sources & reference
Use the authors’ current instructions for your game and package.