Before you start
A supported game and its exact RenoDX instructions. Native DLSS 5 requires supported hardware and a game with DLSS Neural Rendering integration.
Downloads for this guide
Choose the files your setup needs. Paid packages require access through their author.
ReShade with full add-on support
Select the full add-on support build and the version required by your exact game.
RenoDX game-specific downloads
Use the game entry’s Snapshot, Nexus or Discord badge. There is no universal HDR add-on for all games.
RenoDX snapshot assets
Expand Assets and choose the filename specified by your game entry. Snapshots can be less stable.
RenoDX community
For packages distributed through the project’s Discord. Account or channel access may be required.
NVIDIA App
Download from NVIDIA and use Drivers to install the current Game Ready driver.
GeForce drivers
Choose your GPU and Windows version on NVIDIA’s official driver page.
DLSS5-Streamlined setup v0.1
DLSS5_Setup.exe from its author’s release. Not an official NVIDIA or RenoDX installer; check compatibility before using it.
DLSS5-Streamlined release notes
The matching release and assets. Use one coherent package instead of mixing unrelated DLL versions.
Choose the installation route
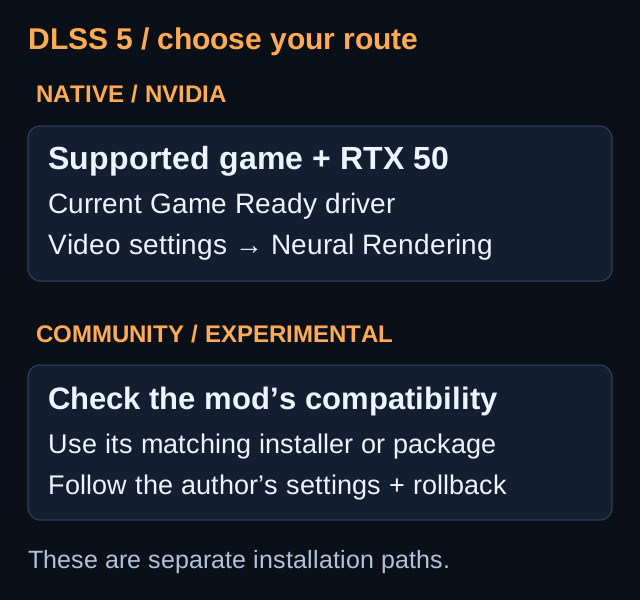
RenoDX HDR uses a game-specific ReShade add-on. Native DLSS 5 uses a supported game’s Neural Rendering setting and supported NVIDIA hardware. Community DLSS 5 uses a separate experimental package and its own compatibility instructions.
A ReShade preset does not install DLSS Neural Rendering. Installing a RenoDX HDR mod also does not automatically enable DLSS 5. Follow the route matching the feature you want.
Prepare a backup before changing the game
Close the game and locate its actual rendering EXE. Check whether it uses DX11 or DX12. Keep the current ReShade configuration, presets and injector files in a backup folder outside the game directory.
If a mod replaces a DLL already in the game folder, keep the original and note its name. Install one mod at a time, then test it before adding another. This makes it possible to identify and reverse a failed change.
Find your game in the RenoDX catalog
Open the official Mods page. Use the download and instructions for your exact game. Game-specific directions take priority over this general layout.
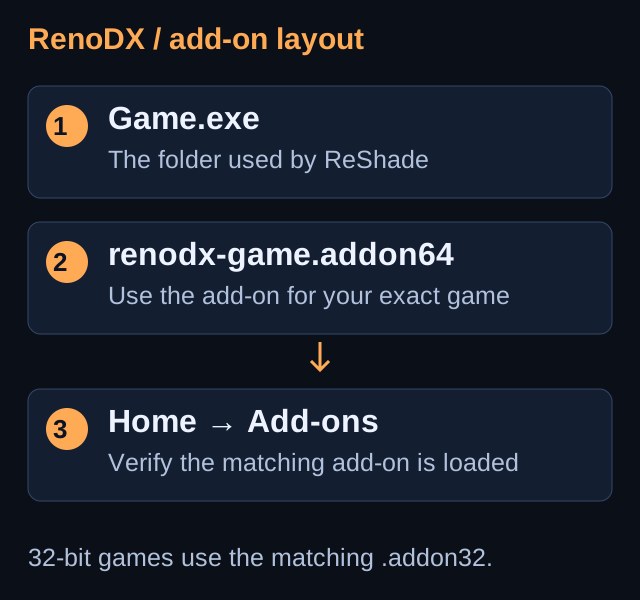
Check the game edition and mod status in the catalog. Use the linked game instructions when selecting a build. The placeholder renodx-game.addon64 in our illustration is an example, not a file that supports every game.
Install ReShade with add-on support
Use ReShade 6.8.0 or newer with full add-on support, unless the game’s instructions require another version. Install it for the real game EXE and the correct API. RenoDX alone does not require effect shader packages.
Do not install duplicate versions of the same add-on. If you already have ReShade, check whether it is the full add-on build before replacing it. Keep any preset files you need.
Copy the matching RenoDX add-on
Place the downloaded .addon64 (or .addon32 for a 32-bit game) in the same folder where ReShade was installed. Launch the game, press Home and check the Add-ons tab. Follow the mod’s HDR and display setup.
Check that the expected mod appears under Add-ons after launch. Set Windows and game HDR as the specific mod directs. If the picture looks washed out, check whether Auto HDR or RTX HDR is applying a second tone-mapping pass.
Native DLSS 5: use the game’s settings
For supported games on GeForce RTX 50 Series, update the game and install the current NVIDIA Game Ready driver. In the game’s video settings, enable DLSS Neural Rendering. RenoDX is not required for this native route. DLSS Super Resolution and Frame Generation are separate settings.
Use NVIDIA App or the official driver page for the current driver. Restart when requested. If Neural Rendering is missing, check the game’s support and hardware requirements; copying a new Super Resolution DLL is not equivalent to adding native Neural Rendering integration.
Community RenoDX / DLSS 5 route
Experimental community option: DLSS5-Streamlined. Its binaries have not been tested in-game for this guide. Check the current README and compatibility; use it only where the game permits graphics mods.
Download DLSS5_Setup.exe v0.1 from the matching author release. Run setup to install the utility, open it and click Browse to select the real game EXE. Enable its DirectX 11 switch only for a DX11 game, then choose Install DLSS 5. Keep its backup behavior enabled.
The package manages dxgi.dll, nvngx_dlss.dll, nvngx_dlssnr.dll and renodx-dlss5.addon64. Its DX11 option also installs a bridge add-on. Use those matching package files together. renodx-dlssfix.addon64 is a different utility, not a replacement for Neural Rendering.
Verify the installation
For RenoDX, confirm the expected add-on appears in the overlay. For native DLSS 5, check the game’s Neural Rendering setting. For a community build, use its documented status indicators and compare the same scene. An installed file alone does not confirm that Neural Rendering is active.
Test movement, menus and more than one scene. Note your GPU, driver, game build and package version when reporting a problem. A file present on disk is not proof that its feature initialized successfully.
Restore your previous setup
Close the game. For a community utility, distinguish removing the desktop utility from undoing files deployed into the game. DLSS5-Streamlined documents a CLI --uninstall option for removing game deployment and restoring its backups; use the author’s exact command syntax.
For a manual installation, restore your own backup and remove only the files you added. Do not delete original game DLLs by name without knowing their source. Test the restored game before trying a different package.
Troubleshooting
RenoDX is missing from Add-ons.
Check the full add-on build, file architecture and folder. The game may render from an EXE in a subfolder. Follow its catalog entry.
HDR looks washed out.
The RenoDX installation guide recommends disabling Auto HDR and RTX HDR when they conflict with the mod’s HDR processing. Check your game-specific instructions and display settings.
Is RenoDX DLSS Fix the same as DLSS 5?
No. renodx-dlssfix.addon64 addresses particular DLSS-related issues; it is not a universal Neural Rendering installer.
The game crashes after adding a mod.
Restore your backup or use the installer’s documented uninstall process. Recheck the exact game version, API and other injectors before retrying.
GO TO THE SOURCE
Sources & reference
Use the authors’ current instructions for your game and package.